Thursday, November 26, 2009

Rooftop Picnic

Looking down on a flat rooftop, I was struck by the low-contrast gray-in-gray pattern of the pipes and cables on the gravel. Then I saw the table and benches made of metal grills and just had to take a picture.

[caption id="" align="aligncenter" width="500" caption="Rooftop Picnic"]Rooftop Picnic[/caption]

Monday, November 23, 2009

Constructing Sunrise

Just after sunrise the light was still warm and yellow-orange, but the sky was already blue with just a bit of color haze over the horizon. You can tell it is still cold by the condensation on the side of the building (that is what the patches are).

[caption id="" align="aligncenter" width="500" caption="Constructing Sunrise"]Constructing Sunrise[/caption]

The lines of the cranes and the building make an interesting composition and the warm light goes well with the yellow metal of the cranes which in turn contrast nicely with the desaturated gray of the building.

Friday, November 13, 2009

Oak Tree in Rapeseed Field

Last week we experienced some lovely fall weather. I was driving when the storm clouds parted to let the sun light up a rapeseed field. I stopped the car at the next safe opportunity and ran out with my camera before the light changed again.

It turned out that the weather stayed like this for a few minutes more than I anticipated and it was on the way back that I got the best images of the oak tree with the orange leaves in the bright yellow and green rapeseed field.

[caption id="" align="aligncenter" width="500" caption="Oak Tree in a Rapeseed Field"]Oak Tree in a Rapeseed Field[/caption]

Much to my chagrin, I was only carrying a JPEG-only tiny compact camera. This really shows at larger print sizes, but for online viewing it is a moot point.

Aside from the cliches that there is no substitute for the right light and that the best camera is the one you have at hand, there is another lesson that I draw from this experience:

Wear sturdy boots when you take a walk in the fields or spend an hour cleaning up your dress shoes. (Yes, it I did. ;-))

Wednesday, November 11, 2009

Cheesecake with Pink Rose

Lately, we have experienced some trouble with our oven. Overcoming these difficulties (by application of an oven thermometer and dialing in some temperature compensation) my wife has managed to bake one of her wonderful cheesecakes to her satisfaction again. Here is what it looked like in all of its scrumptious goodness before our guests found it:

Cheesecake with Pink Rose

I think that Andrew will be most pleased; now that harmony has been restored, my wife can try his delicious cheesecake recipe. :)

In case you are interested, I deliberately underexposed by about -2 EV to get rich, saturated colors. Yes, the browns are now very dark, so the edges look like they may have been baked a bit crispy. If this was for a cookbook (instead of a mood shot), I might use a mask in Photoshop to lighten the edges of the cake. As it stands, I prefer the mysterious, moody richness hinted at in this image.

Thursday, November 5, 2009

Surfer riding the Waves

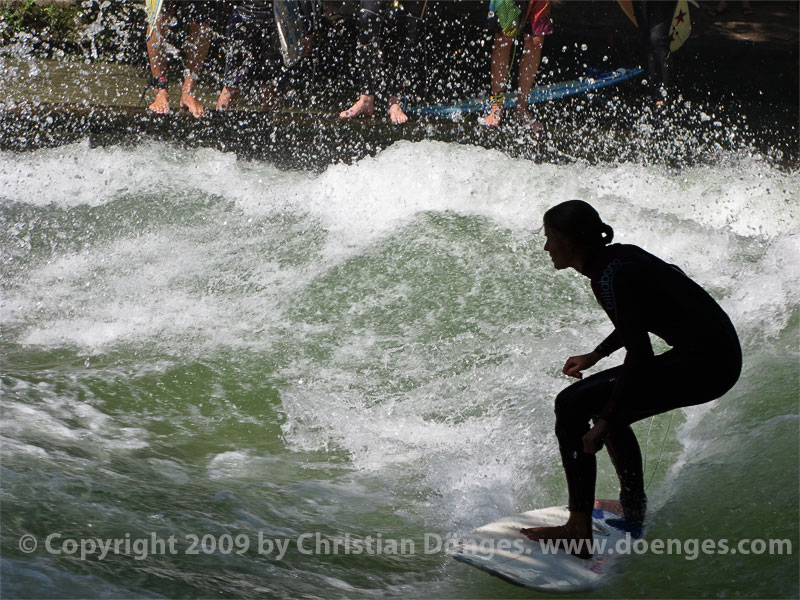
Apparently the Eisbach in München is a hot place to ride the waves on a surfboard. As you can see from the photo below, it is not very wide (only a few meters) and there is quite a crowd queued up on hot summer days waiting their turn. There are many, many more spectators milling about, so if you are a beginner, you might want to choose someplace more private to fall in. :-)

This surfer did quite well, staying on the board for a long time while riding back and forth as the waves took the board:

[caption id="" align="aligncenter" width="600" caption="Surfer riding the waves."]A surfer riding the waves. [/caption]

I like the stark contrast between the foamy white spray, the rich green of the water, and the dark silhouette of the surfer. Look at how the line formed by the torso and head is mirrored in the lines of the waves in the background.

To me this picture shows the dynamic, fluid unity that the surfer needs to achieve with the water in order to stay on the board.

Sunday, October 4, 2009

[Book Review] Within the Frame - The Journey of Photographic Vision

[amazon ASIN=0321605020]Within the Frame - The Journey of Photographic Vision[/amazon] by David duChemin may easily be the most unusual - and best - book on photography that I have read this year. It is unusual in that it manages to bridge the gap between books about photography as art and photography as technique, delivering both. In my opinion, that is what photography is about.

The first chapter is devoted to vision - what it is that you see and want to communicate. The second chapter focuses on what feeling, idea, or impression you may want to capture and what subjects may show this to the viewer. The third chapter on gear and technique required to get the image you want. I think that the focus not on creating technically perfect pictures but on how to turn something you want to communicate into a picture is spot-on. The author really nails it here!

The fourth chapter is about storytelling in pictures - how to tell a story in a single frame or in a photo essay, how to create interest in the viewer. This chapter is a must if you want to go from mere visual candy to a four-course meal.

The next chapters are about photographing people, places, and culture. I really enjoyed the chapter about people (I love photographing people and got a number of useful tips and ideas from the chapter), but found that my attention flagged halfway through the places chapter, and did not pick up to the end of the book. It seems to me that the essential message of the previous chapters are repeated a bit too often.

The pictures in the book are compelling and beautiful, the printing is of high quality. You can find a number of them on his website at www.pixelatedimages.com if you are interested. Despite all of the pictures having been taken in what amounts to "exotic" locations for most people from Europe or North America, I would not say that it is about travel photography. Everything in the book applies to taking pictures of your home town. Maybe even more so than when you are abroad ...

I feel great respect for the way David duChemin approaches his subjects as human beings, not just props in his pictures. I feel the same way and I became aware of a lot of things that I have done without ever thinking about them. I have also learned a few very useful things about how to approach people.

The same applied for his treatment of technical aspects: he makes things that I have been doing intuitively become conscious decisions, giving me much more control. For example, I wish that I had read what he has to say about lens choices much earlier, it has taught me the value of wide-angle lenses, which I rarely use. This will definitely improve my ability to show my vision to the world. (Interestingly, he apparently went through a similar development, starting with telephoto lenses and only gradually learning to use wide lenses.)

Finally, I learned ever so much from his approach of treating photography as storytelling. If this is - as to me - a closed book (pun intended), you will benefit greatly from [amazon ASIN=0321605020]Within the Frame[/amazon].

As I mentioned before, my attention and interest flagged towards the last two chapters. Maybe it was just too much to absorb? Maybe the chapters are simply weaker than the previous ones? I do not know. But I do know that even without the last two chapters the book is definitely required reading for anyone interested in photographing people, so it gets five stars!

[caption id="" align="alignnone" width="111" caption="5 stars (out of 5)"]5 stars (out of 5) [/caption]

Tuesday, September 29, 2009

Black and Orange Butterfly

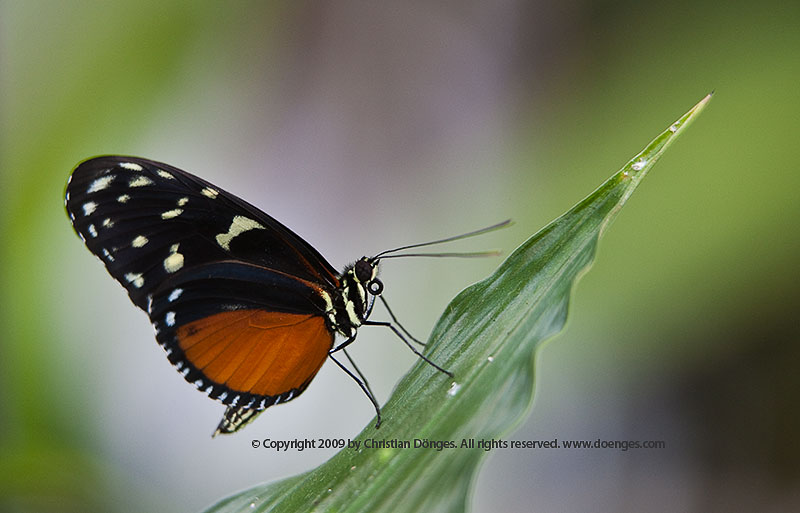
I saw this unidentified black, orange, and off-white butterfly at the same show as the last post:

A black, orange, and white butterfly sitting on a green leaf tip.
Black, orange, and white butterfly on a green leaf.

The slight motion blur of the wings and antennae make the butterfly come alive for me.

This image, like the last, was taken in available light at ISO 400, 1/80s, f/2.8.

Monday, September 28, 2009

[Howto] Using Canon WFT-E1 with Mac OS X 10.5

The Canon WFT-Ex/WFT-ExA range of products (currently E1..5) are wireless 802.11b/g transmitters that connect to Canon DSLRs and upload photos directly to an FTP server. There is also the option of connecting an Ethernet cable if you do not want or can not use a WLAN connection.

Each DSLR works with a different WFT product, so you will have to check which one is right for your camera. The WFT-E1 works with the 1D Mark II, 1D Mark II N, 1Ds Mark II, 5D, 20D, and 30D cameras, for example. The WFT-E1A is the North American version that only differs in the available WLAN channels from the rest of the world (WFT-E1).

You connect the WFT-E1 via either a Firewire (1D, 1Ds) or USB (5D) cable to the camera. Turn it on ... and nothing happens. It's actually a bit more work than that. ;-)

The following instructions will walk you through how to set up both a Mac with an Airport connector and the WFT-E1 so that you can transmit photos directly to your Mac. This is a useful setup if you want to be highly mobile. It is also possible to go through a WLAN access point, which is often better than connecting directly to the Mac, but that will be the subject of a follow-up post.

There is quite a bit of setup required to get things to work, but I believe it is well worth the effort. Let's get started!

Black and Yellow Butterfly

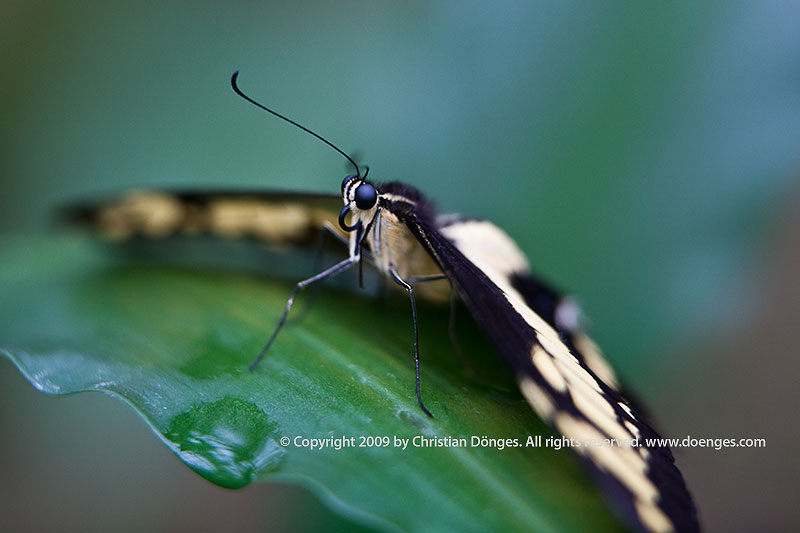
Earlier this year, I visited a show of tropical butterflies. It was cold outside and way too hot and humid inside. However, the water drops dripping about everywhere made for some really nice pictures with the colorful butterflies:

A black and yellow butterfly sits on a green leaf, just as a drop of water is about to fall.
Black and yellow butterfly on a green leaf.

Notice how the narrow depth of field draws your eyes to the eyes of the butterfly. I feel as though it will dip into the drop of water for a quick drink before taking off again.

Unfortunately, I did not take any notes and I can not find the name of this wonderful little critter.

For the technical minded: the picture was taken in available light at ISO 400, 1/80s, f/2.8. It would interest me to see how the image would look at f/4 or even f/8 with increased depth of field to include the butterfly wings ... next time. :-)

Monday, September 14, 2009

Fireworks over Church Tower - How to Photograph Fireworks

Freising is having it's 80th annual fall fair this year and the town celebrated the last day today with some spectacular fireworks:

[caption id="" align="aligncenter" width="600" caption="Blue Fireworks over Church Tower."]Blue fireworks in the night sky over a church tower. [/caption]

In case you are wondering, it is actually quite easy to make this kind of photo if you know what you are doing:

  1. Set your camera on a tripod and use a cable release or a remote control (infra red remote, RadioPopper, PocketWizard, you name it) to trigger the exposure. I use a simple remote control cable.

  2. Turn off the auto-focus and manually focus the camera (usually to infinity). This is faster and more reliable than having the AF hunt the night sky.

  3. Crank up the ISO as far as you are willing to live with the noise. For example, on a Canon 5D, ISO 800 is great and ISO 1600 is acceptable. A Nikon D3X will go even higher, as will a Canon 5D mark II. A pocket digicam will probably struggle at ISO 400 and above. Experiment - preferably before the big event.

  4. Use manual exposure mode and open the aperture as wide as it will go.

  5. Still in manual exposure mode select a good exposure time. I find that between 1/125s and 1/8s works well.

  6. Expose at will and enjoy the show!


[caption id="" align="aligncenter" width="600" caption="Green Fireworks over Church Tower."]Green fireworks in the night sky over a church tower. [/caption]

I usually use the camera screen to judge exposure. That is, I set the aperture wide open and shoot at whatever exposure time I have guessed. Usually 1/60s is a good place to start as any.

It is normal to see some blown highlights in the middle of the explosions and at the back of the rocket engines. Because of this the histogram and the blinkenlights are useless. Instead, ensure that the night sky is black and that the fireworks are clearly visible.

If the sky is too light, shorten exposure time and/or reduce the ISO. Similarly, if the fireworks are too dark, lengthen exposure time and/or increase the ISO.

Once I have set up the exposure correctly I point the camera at a likely section of sky and snap away. Since the exposure will not change, I only change it to get a different effect. There is no need to check every image.

In fact, I simply snap away until either the fireworks stop or I grow tired of taking pictures. It's a good idea to have some spare batteries and memory cards on hand ...

That's it. Have fun!

Wednesday, September 9, 2009

Dragonfly Sunning on a Rock

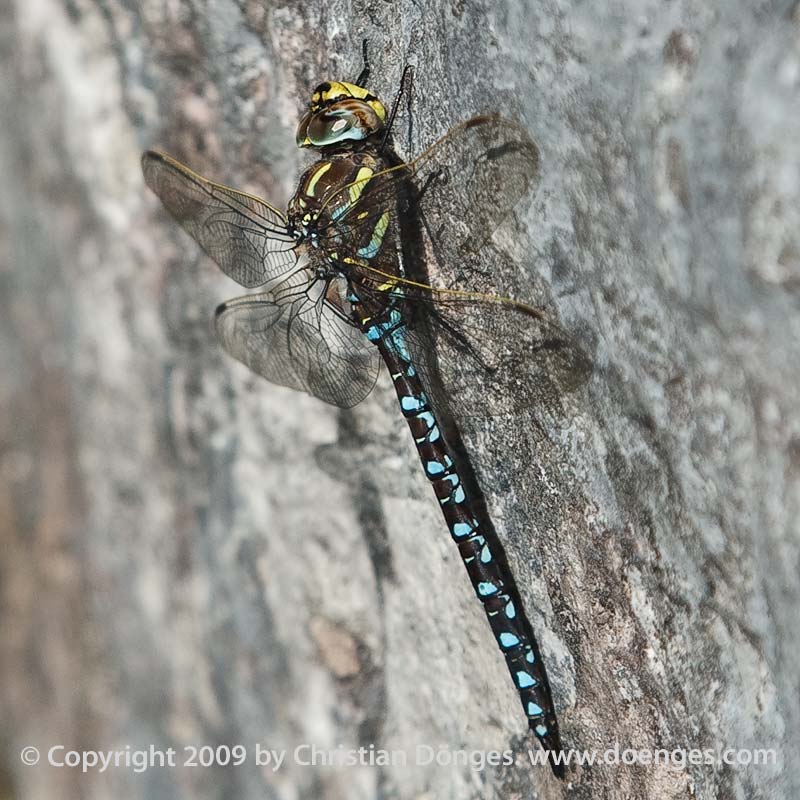
Last weekend I came upon this dragonfly while walking along the Große Laine in Jachenau in the Alps.

[caption id="" align="aligncenter" width="600" caption="Dragonfly Sunning itself on a Rock."]A dragonfly sitting on a warm rock, enjoying the heat of the sun. [/caption]

The dragonfly zoomed about over the water of the river for a while before landing on the face of a large boulder to spread its wings and enjoy the warm sunlight. I was able to get consecutively closer to take some pictures before a child popped up over the top of the rock, peering straight down at the dragonfly. This, of course, was a bit too much for the dragonfly, which took off.

I really love the comment of the child: "I guess it thought I was going to kill it." - Spot on, dear!

Friday, August 21, 2009

Painted Lady on Purple Lilac

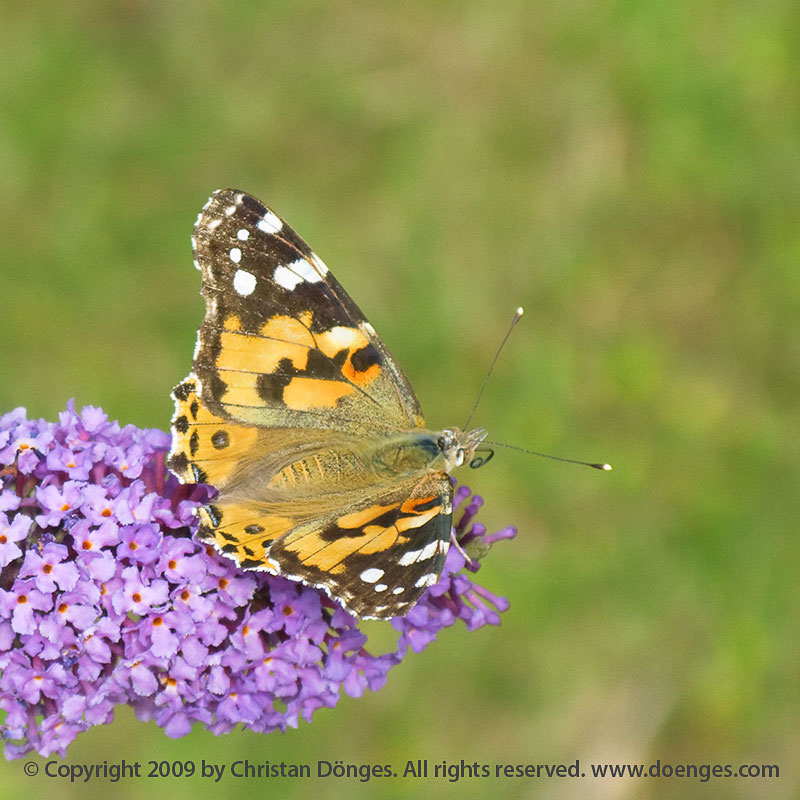
While out walking I spotted this Small Tortoiseshell Painted Lady butterfly sitting on a purple lilac:

[caption id="" align="aligncenter" width="600" caption="Painted Lady butterfly sitting on a purple lilac."]Painted Lady butterfly sitting on a purple lilac.. [/caption]

For some reason, lilacs seems to drive butterflies in general and these in particular into an ecstatic frenzy: the butterflies come from all over, congregate on the blossoms, and flutter about as if delirious with pleasure. I guess the nectar from the blossoms is really, really tasty.

Photographically speaking, the image was quite a challenge to obtain: I was carrying only a Canon G9 at the time, so I had to get quite close to the butterfly to be able to photograph it. And even though the butterfly was having a really good meal, it clearly did not want to become a meal for someone else - so it was moving about at a brisk pace and did not allow me to get very close at all.

I cranked out the zoom all the way and held the camera at arms length, which at least allowed me to get close enough to get a significant part of the frame to show butterfly, not background.

The problems did not end here: when cranked out fully, the G9 is at f4.8 and the late afternoon light was not bright enough to allow a short enough exposure to freeze the butterflies motion at ISO 80, which is the lowest ISO the G9 will allow. (I usually use ISO 80 to reduce noise to the minimum.) In this case, I decided that noise would be less of a problem than motion blur and set the ISO to 200 to allow a 1/320s exposure.

The result is adequately sharp. If you look very closely, you can tell that sharpness begins to drop off near the butterfly head. Just a little bit softer and I would have tossed the image - I guess that having a small sensor (and therefore great depth of field) was good in this case.

Update 06-MAY-2010: Reader J Danson kindly pointed out that this is not a Small Tortoiseshell but rather a Painted Lady. He's right, so I've fixed the posting but have left the URL intact.

Monday, August 17, 2009

Spider in its Web

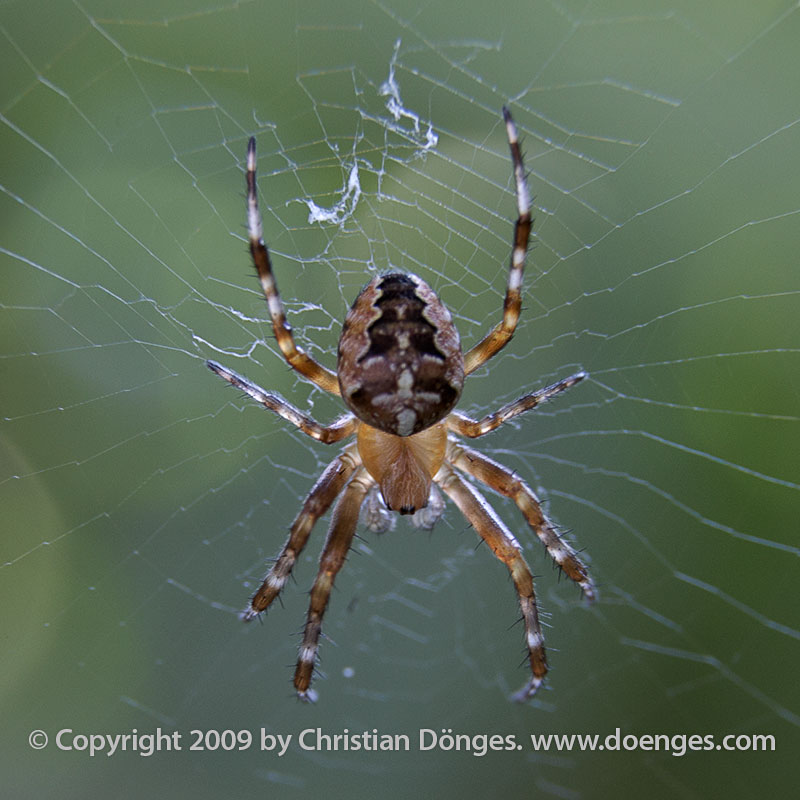
The garden spider or cross spider is one of the more common (and quite harmless) spiders that builds large circular webs. This one is a european garden spider or diadem spider (Araneus diadematus) which my daughter found in our garden:

[caption id="" align="aligncenter" width="600" caption="Back lit diadem spider in its web."]Diadem Spider in its web. [/caption]

In this image, I like the way the sunlight shines through the lighter parts of the spiders body, making it appear that the spider glows from within.

As I was watching the spider and photographing it I saw it catch three small flies in its web. I guess that pretty soon this spider is going to be quite a bit larger ...

Thursday, August 13, 2009

Calendula blossom

This calendula blossom opened up early in the morning, which is supposed to be a sign of good weather.

[caption id="" align="aligncenter" width="600" caption="Calendula blossom with rain drops."]Calendula blossoms with rain drops. [/caption]

For some strange reason it started raining as I was taking the picture (you can see some rain drops). It is good that I found the information about the "sign of good weather" on wikipedia because that means it must be true. :-)

Friday, August 7, 2009

Muscial Performance

I was invited to be the official photographer covering the performance of a childrens musical. Over 130 kids performed on stage - everything else was a huge volunteer effort by the parents. It was great fun to see how enthusiastic the kids (aged 6 to about 19) were and how much fun they were having on stage!

It was also a great learning experience, since this was the first time I have done any stage photography. Out of over 1000 exposures I got about 500 that are decent and 150 that I consider good. The main lesson here: consider depth of field. It will not do to shoot several people with an aperture of f2.8 if they are not exactly the same distance from the camera.

The second lesson is that I need to sort out the model releases before, not after, the event. Now I am identifying the performers and contacting them or their parents directly for permission to publish - it would have been much easier if we had sorted this out when the kids signed up to participate.

Here are "Wolfgang 4" (Mozart as a man) with his mother:

[caption id="" align="aligncenter" width="600" caption="Performers 'Wolfgang 4' and 'Mozarts Mother'."]Performers 'Wolfgang 4' and 'Mozarts Mother' in the musical. [/caption]

As I get the releases straightened out, I will post more images of the event. Subscribe the RSS feed to be notified of updates.

Monday, August 3, 2009

Marmelade Fly on Yellow Flower Reprise

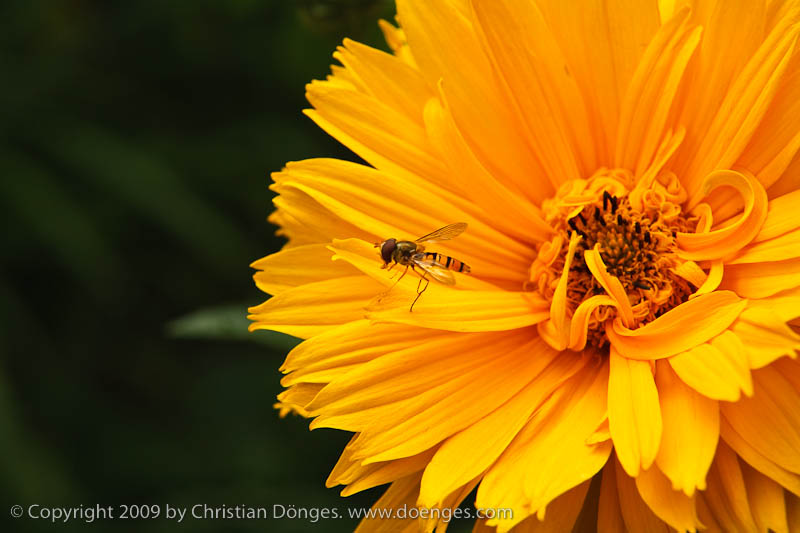
In the last post I showed a picture of a marmelade fly on a yellow flower. I would like to revisit that picture to show how much an image can change depending on how - and with which tools - it is processed.

The original image was captured in RAW format. I then processed it in Adobe Lightroom 2. The result is this:

[caption id="" align="aligncenter" width="600" caption="Marmelade Flies on a Yellow Flower processed in Adobe Lightroom 2"]A marmelade fly rests on the petals of a large yellow flower before taking flight. [/caption]

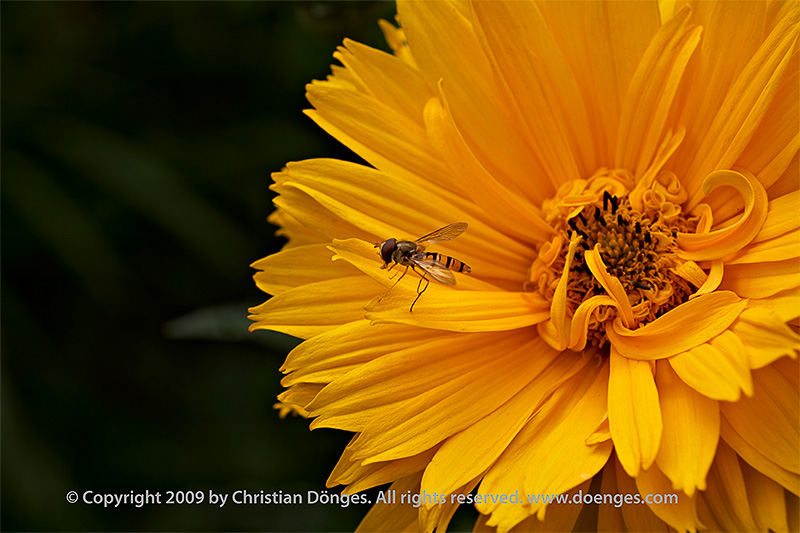
While I was reasonably happy with the image, I had to do some testing in Capture One Pro and decided to see if I could do better. I have long thought that Capture Ones color rendition is much better than Lightrooms. But judge for yourself:

[caption id="" align="aligncenter" width="600" caption="Marmelade Flies on a Yellow Flower processed in Capture One Pro and Photoshop"]A marmelade fly rests on the petals of a large yellow flower before taking flight. [/caption]

Quite a difference, don't you think? The first rendition looks almost like a painting while the second is so real you can almost touch it.

So how was it done?

I first opened the file in Capture One and set the exposure so that none of the color channels would clip. This part is identical to what I did in Lightroom. Note that the yellows are a bit darker in the C1 rendition than in LR. I then exported a 16-bit TIFF file to Photoshop from C1.

In Photoshop I created a mask to darken the green part to the left of the flower using a curve. A second mark darkened the bright leaf to the left and below the marmelade fly. Then I removed some spots from the yellow petals which were really there (i.e. not dust on the lens or sensor) but which I did not like. All of these steps are identical to what I did in Lightroom except that I did not darken the single bright leaf in LR.

I then added a watermark copyright note and reduced the size of the file. Finally, I used Pixel Genius PhotoKit Sharpener for output sharpening. All of this is fully automatic during the Lightroom export.

In total I spent about five minutes in Lightroom to get a decent image. I spent about half an hour in Capture One and Photoshop to get an excellent image. There is clearly a trade-off time for quality here.

That is why I usually perform all my culling, keywording, and rough editing in LR. When I have identified the handful of images with real potential I spend more time on them in C1 and PS. Now if only I could take the LR settings and use them in C1 so that, for example, I do not have to re-crop ...

Friday, July 31, 2009

Mamelade Fly on Yellow Flower

It seems that we did not have a marmelade fly image for about ... 2 days now, so I think it is time for another :-):

[caption id="" align="aligncenter" width="400" caption="Marmelade Flies on a Yellow Flower"]A marmelade fly rests on the petals of a large yellow flower before taking flight. [/caption]

You might also want to enjoy the beautiful texture of those wonderful yellow flower petals. I did not play with the saturation, the color really is that lush!

Tuesday, July 28, 2009

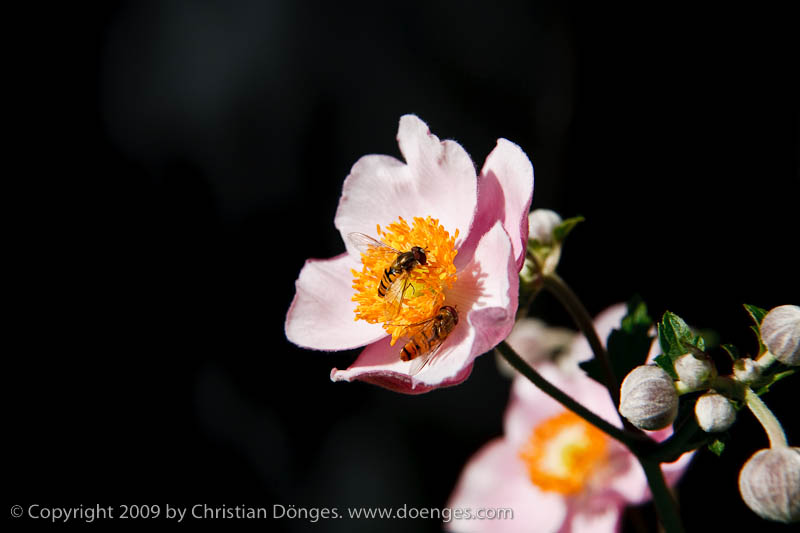
Marmelade Fly on Pink Anemone

As I said a few days ago, the anemones are currently popping up like crazy. It seems they are not the only ones, we've also got a huge number of mamelade flies:

[caption id="" align="aligncenter" width="400" caption="Marmelade Flies on an Anemone Flower"]Two marmelade flies collecting pollen and nectar from an anemone flower. [/caption]

As you can tell, a marmelade fly (Episyrphus balteatus) looks a bit like a solitary wasp, but it really is a hoverfly and therefore quite harmless. Harmless to everyone and everything but aphids (plant lice or greenflies), that is, which the larvae (would that be marmelade larvae?) are fond of eating.

For this reason the marmelade flies are quite welcome in my garden and I like to have them come around. In case you are wondering, they do not seem to have the habit of becoming annoying like their house fly cousins.

These two, incidentally, are both males. You can tell this because the eyes touch at the top of the head, which is unique to the males. Isn't it cool what you can find out if you take an interest in what shows up in your pictures? ;-)

Monday, July 27, 2009

Yellow Flowers in Front of a Blue Sky

Here's a fun shot I took while on my belly in the gras:

[caption id="" align="aligncenter" width="533" caption="Yellow Flowers in Front of a Blue Sky"]Yellow Flowers in Front of a Blue Sky. [/caption]

I had to resist the temptation to increase the saturation of the blue sky to get a more in-your-face look, which would have meshed well with the super-saturated color of the flower. I prefer this rendition because it conveys the light, sunny feel that goes with that particular sky - if you have ever been to Bavaria in that kind of weather, you will know what a "Bavarian Sky" is and what I am talking about.

Sunday, July 26, 2009

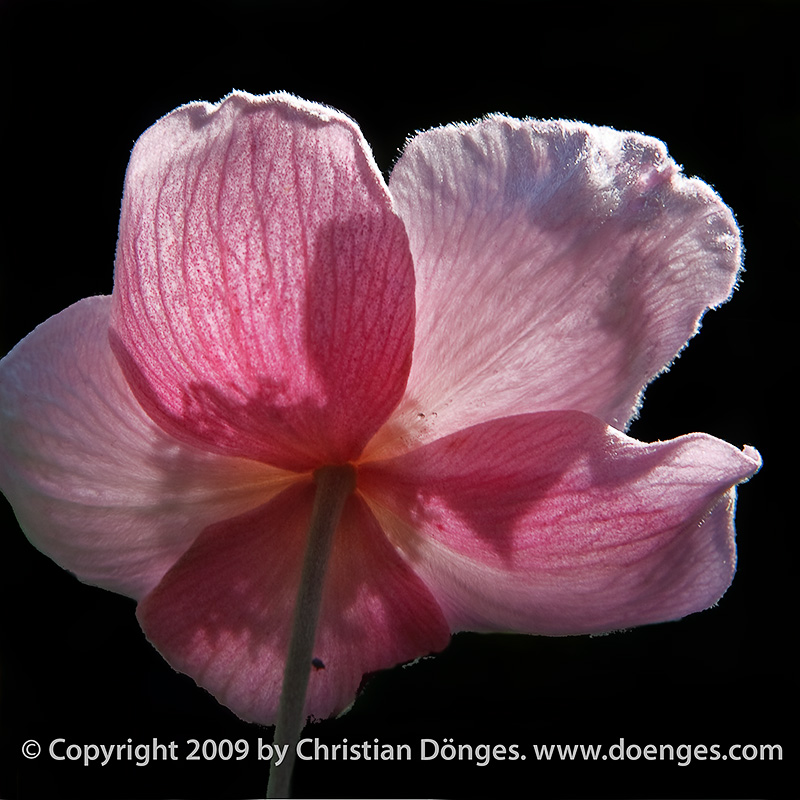
L'anémone primeur est arrivé!

The anemones have just begun to bloom. I love these flowers and relish the opportunity to take pictures of them. Here is this year's first (good) anemone picture:

[caption id="" align="aligncenter" width="640" caption="Pink Anemone Flower"]A pink anemone flower photographed against the light. [/caption]

I like anemones for their delicate beauty which is so visible when you look at the colored veins and spots against the light. Can you see the tiny hairs that line the petals? And the shadows the flower throws on itself in the sunlight?

Have I mentioned that I really love these flowers? No, I do not think you could have guessed. :-)

Tuesday, June 30, 2009

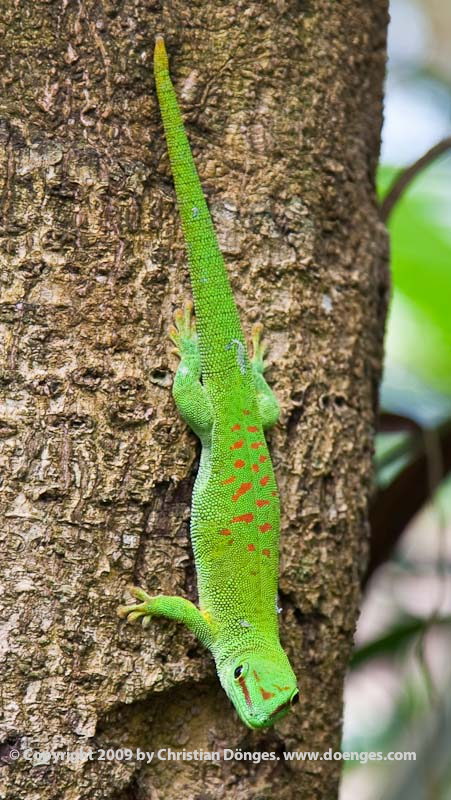
Green Lizard

The green streak on the brown bark of the tree caught my attention. It turned out to be a wonderfully fluorescent green lizard sitting upside-down on the trunk of the tree:

[caption id="" align="aligncenter" width="451" caption="Green Lizard"]A bright green lizard on a tree. [/caption]

I am not quite sure what the lizard was looking at. Perhaps the person behind the camera was every bit intriguing as the lizard in front of the camera?

Fern Spiral

A fern leaf unrolls itself from a tightly wound spiral towards the light as it grows.

[caption id="" align="aligncenter" width="600" caption="Fern Spiral"]A fresh fern leaf spirals up towards the light. [/caption]

Ferns as a group are quite old - the fossil records date back to the early Carboniferous period, so roughly 360 million years ago, have been found. Isn't it amazing that organisms are so well adapted that the species survives almost 400 million years and shows no sign of weakness?

Even though this long history is certainly not unique to ferns, I always get the feeling that a dinosaur might peek through the leaves at me when I come across a fern ... ;-)

Sunday, June 28, 2009

Book Review: The Hot Shoe Diaries

Joe McNally's [amazon ASIN=0321580141]The Hot Shoe Diaries: Creative Applications of Small Flashes[/amazon] is about lighting using small flashes (strobes). If what you find on Strobist is not enough, this is the book to get.

Joe starts by describing his gear. He's a Nikon guy, clearly in love with his gear, and he clearly knows his stuff very well. I use Canon, so was there a problem? No. Most of what the Nikon strobes can do Canon can do too (and vice versa) so if you understand what he explains, it is quite simple to translate into the Canon world. Effectively you loose less than a dozen pages to "Nikonese".

Joe then presents a large number of his images, explaining how he lit each one of them. There is a lot of anecdotal background describing how he came to make each shot, which I found quite entertaining.

Speaking of which, Joe is very funny. I laughed out loud a number of times reading the book which is something that can not be said of many photography books. If photography and comedy turns you on, this may be the book for you ...

I found the description of how each image was created easy to understand and visualize (sketches are provided for the mor elaborate setups). Joe clearly is an experienced educator, I had no trouble following him and creating some of the effects.

The selection of images is quite useful as a number of concepts or different ways of lighting are explained which can then be combined for good effect in your own photos. While some pictures are way beyond my ambitions (I do not see myself rigging a dozen strobes to an airplane ... I do not have a dozen strobes :-)) most are directly applicable to situations and subjects that anyone might encounter. I learned a huge amount of practical knowledge.

To summarize: if you are interested in lighting using strobes, this is simply the book to get.

[caption id="" align="alignnone" width="111" caption="5 stars (out of 5)"]5 stars (out of 5) [/caption]

Wednesday, June 24, 2009

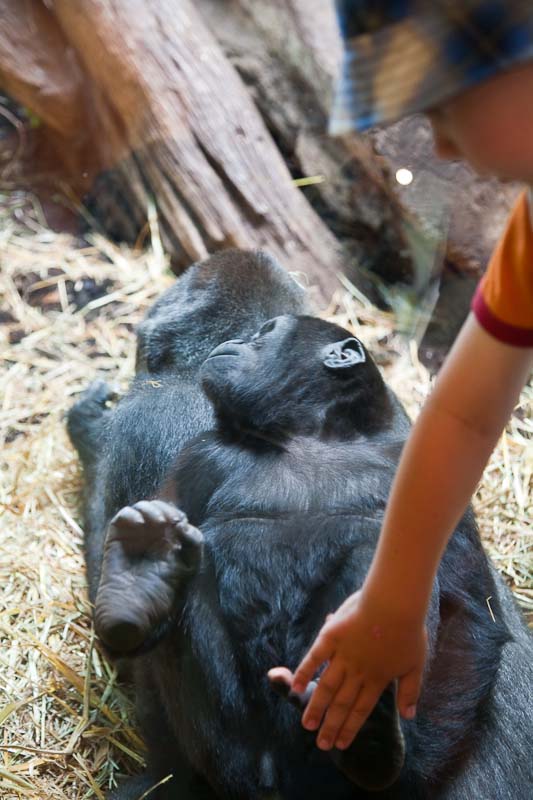
Man-child meets Gorilla-child

While visiting a zoo, I saw a wonderful scene:

[caption id="" align="aligncenter" width="533" caption="Man-child meets Gorilla-child"]A boy touches a gorilla child through a pane of glas. [/caption]

A gorilla child was lying on his (her?) mothers back, clearly enjoying the snuggle, and resting his feet on the pane of glass that makes up their habitat.

A boy came along and, wanting to meet the gorilla, touched the apes feet through the pane of glass with his hand. He seemed a bit disappointed that all he felt was the cool, smooth glas, not the warm and soft being on the other side.

I was stuck by the thought that if it is possible for a man-child to reach out to a gorilla-child, how much easier it must be for man-child to reach out to man-child.

Tuesday, June 23, 2009

Panasonic DRMs Camera Batteries

Panasonic have warned customers of certain (unspecified) non-Panasonic batteries because
"Some of these aftermarket batteries are not equipped with internal protective devices to guard against overcharging, internal heating and short circuit. If these aftermarket battery packs were used, it could lead to an accident causing damage to your camera or personal injury."

So they issued a firmware update to "detect these aftermarket 3rd party batteries so such serious safety issues can be avoided." Panasonic then warn the user
"After this firmware update your Panasonic Digital Camera cannot be operated by 3rd party batteries (non genuine Panasonic batteries)."

This smells like Panasonic are locking their customers into (expensive) original Panasonic batteries using DRM techniques. Or is it really a safety issue?

Monday, June 1, 2009

Using a PrimeFilm Scanner with VueScan on Mac OS X

We recently received some photos from a family event that were - gasp - made using analog film. You should have seen the look on the face of the dozen or so children when they crowded around the SLR expecting to see a preview on the LCD only to discover that there was no LCD on the back of this camera. Talk about culture shock. ;-)

Anyways, the quality of the prints was appaling, as where the scanned images on the CD that came from the processing lab. The negative, however, looked fine to my no-longer-used-to-look-at-negatives eyes. I decided to revitalize an old film scanner I still have in a box. It is a rebadged Pacific Imaging PrimeFilm 1800u scanner, which will turn a negative into a 4 Mpxl file with 16 bits per color channel.

I like using VueScan with flatbed scanners. It is a low-cost, high-power solution and Ed Hamrick does a fantastic job of supporting almost every scanner under the sun. My experience so far has been that you plug in the scanner, start VueScan, and start scanning.

With the PF1800u it turns out to be a little bit more complicated than that:

  1. Download the latest driver from Pacific Imaging, an application called CyberViewX_SF. Localized non-english variants are available.

  2. Install the driver at the default location (/Applications).

  3. Find VueScan on your hard drive and Get Info in the Finder. You can do this by using the context menu (right-click or control-click), hitting CMD-I, or File > Get Info in the menu.

  4. Make sure "Open using Rosetta" is ticked (see below).

  5. Connect the scanner to your computer and power it on.

  6. Start VueScan.


[caption id="attachment_377" align="alignnone" width="163" caption=""Open using Rosetta" in the Finder "Get Info" panel."]"Open using Rosetta" in the Finder "Get Info" panel.[/caption]

You can skip steps 3 & 4 if you are using a PowerPC Mac. CyberViewX_SF is a PowerPC application, so Intel Macs need to be told to run PowerPC code because though VueScan is a native Intel application. I wish Pacific Imaging would update their driver!

I had some difficulties because CyberViewX_SF is not in the default install location on my system. In this case, VueScan can not find the driver it needs and complains.

If you - like I - want to put your applications in a non-default place, you can create a soft (or hard) link to it to make VueScan happy:

$ sudo ln -s /Applications/Graphics/CyberViewX_SF /Applications/CyberViewX_SF

where "/Applications/Graphics/" is the location of the CyberViewX_SF folder. That's it!

Thanks to Ed Hamrick for the great support!

Monday, May 4, 2009

HDR using Photoshop vs. Photomatix

Processing multiple exposures into a single HDR (high dynamic range) image turns out to be more of a subjective process than I initially thought.

Have a look at the following image, which was processed using Photoshop CS4 and the "Merge to HDR" feature:

[caption id="attachment_366" align="alignleft" width="534" caption="Image processed from 3 exposures by Photoshop CS4 "Merge to HDR"."]Image processed from 3 exposures by Photoshop CS4 "Merge to HDR".[/caption]

Not bad, really, at first glance. But notice at the right edge, about halfway down the image, how the arch coming in from the wall is completely blown out?

Now look at the same source exposures converted by Photomatix:

[caption id="attachment_367" align="alignleft" width="533" caption="Image processed from 3 Exposures by Photomatix Pro."]3 Exposures processed by Photomatix Pro.[/caption]

The highlights are not blown out, the tonality of the image is smoother, the reddish cast is reduced. All in all, the image is much closer to the intended look than what Photoshop allows.

Given that Photomatix allows me a lot more control to tweak the result than Photoshop, I think the money is well spent on Photomatix ...

Thursday, April 30, 2009

Book Review: Lighting and the Dramatic Portrait

Michael Grecco's Lighting and the Dramatic Portrait starts of by discussing various camera systems (35 mm, medium format, and large format) and their particular characteristics.

Then a number of pictures are presented with diagrams and text describing exactly how the lighting was set up to achieve the desired result. This is extremely useful to help understand how the picture was made. Why on earth the client contact for the picture (usually art director so-and-so) is important in this context is beyond me, however ...

The remaining pictures are described without a diagram, but I had no trouble understanding the light after the previous chapter with diagrams.

I really like that Grecco not only explains the technical detail of the shot but also why he made it the way he did. Sometimes the reason is his creative vision, at other times it is a restraint that came up during the shoot (the subject objected, for  example) or the image evolved in the process of shooting, often in collaboration with the subject.

Grecco's method seems to involve a truckload of equipment and a horde of assistants and specialist. This should not intimidate the reader. Most of what Grecco describes can be achieved on a much lower budget using inexpensive speedlights and some tinkering (and gaffer tape ;-) - the same principles apply as with super-expensive studio lights.

The book is strongly recommended to anyone looking to improve their lighting skills, especially when photographing people.

[caption id="" align="alignnone" width="111" caption="5 stars (out of 5)"]5 stars (out of 5) [/caption]

Tuesday, April 28, 2009

Church Ceiling

Church ceiling

The ceiling of the Freising cathedral.

The previous cathedral burned down almost exactly 850 years ago (April 5, 1159). Work on the current church started almost immediately but it took almost 100 years until the church was finally consecrated.

The interior was remodeled a number of times with the current rococo ceiling having been created by the Asam brothers around 1724. Everything looks shiny and new because major renovation and restoration works were completed recently.

The difficulty in capturing a scene like this is that the light coming in the windows is extremely bright while the shadow areas can be very dark. Most digital cameras can not handle the dynamic range in such a scene.

The solution is to use HDR (high dynamic range), which is a technique to squeeze more extreme light and darkness into an image than the camera sensor can capture. The trick is to create several exposures of the same scene (a tripod really helps :): one frame exposes the highlights correctly, the next the midtones, the final frame the shadows. Software magic then combines everything into one image. Because most monitors are 8-bit-per-color-channel devices (and JPEG supports only 8 bits per color channel) the resulting image is then rendered down into an 8 bit per channel representation.

The difficulty lies in the number of choices that must be made at every step. It takes a bit of experimenting to get good results.

Wednesday, April 22, 2009

Book Review: Take Your Photography to the Next Level

George Barr Take Your Photography to the Next Level, From Inspiration to Image is a book about improving yourself as a photographer to create better images. Like Alain Briot's Mastering Landscape Photography is puts the photographer, the artist ahead of the equipment and the technique.

Sunday, April 5, 2009

[Review] Unicomp Customizer 105 Keyboard

If you are old enough, you may remember the "original" IBM PC keyboard from the early 80s (yes, folks, that is 1980s!). The one memorable characteristic of that keyboard is probably the sheer noise of it. Every key press yields a loud, solid "thunk". I can not help but see a group of product designers before my mind's eye: "... we have got to make a keyboard that lets the boss know his secretary is working ... sounds like a real typewriter ... imagine an entire room full of these ..." and so on. :)

The real reason the keyboard was so loud is the switch technology employed. The bucking spring switch contains a spring that collapses (buckles) under pressure, giving tactile and audible feedback that the key press has been detected. More info in Wikipedia and Clickykeyboard.com.

A lot of people like the tactile feel of the keyboard as well as the ergonomics - apparently the fingers slow down less abruptly than with more modern (and cheaper) switches, so RSI is less of a risk. [I could not find a good source for this claim, so you may want to take it with a grain of salt.]

I happen to to be one of those people, so I went to the people who still make them, a small company called Unicomp, and bought a Customizer 105 with a USB interface and German keyboard layout.

The keyboard hooks up to any computer with a USB port and works like a ... keyboard. What did you expect? :-)

My office now sounds like I have my own secretary typing away at an ancient typewriter as I am writing this. My fingers are wonderful. I love the feel! It is way too early to comment on RSI ...

Apparently buckling spring switches last close to forever. My brother uses an original IBM PC model M keyboard to this day ... Which means that this keyboard should last me a decade or two. Then again, I have only had one keyboard malfunction mechanically in my entire life and if memory serves correctly, some object falling on it caused the damage. That, I guess, means that I can take mechanical robustness for granted.

Disadvantages? The price is stiff at $69 plus shipping. It is pretty loud. It is not exacly Apple design (it's apparently made on the very machines that made the original IBM model M). It lacks all of the fancy modern keys for volume control, iTunes playback, optical drive eject, etc. but the most important of the lot, optical drive eject, works by holding down F12.

Do I recommend it? Well, if you think about how much time your fingers spend on a keyboard every day, I would say that almost any amount of money is worth it if it makes your fingers happier. And you can always drown out the sound by turning up the volume in iTunes. :-)

[caption id="" align="alignnone" width="111" caption="5 stars (out of 5)"]5 stars (out of 5)[/caption]

Monday, March 30, 2009

Change Keyboard Type on Mac OS X

I had an interesting experience with Mac OS X (10.5.6 for the record) today: I use a KVM switch to connect a single keyboard, monitor, and mouse to a number of computers. I swapped my Microsoft Comfort Curve Keyboard 2000 for a Unicomp Customizer 105 (which rocks, by the way!) and started typing away. To my dismay, the ^° key was recognized as <> - and vice versa.

The keyboard layout was still correctly set to a German layout but Mac OS X thought that the KVM switch was the actual keyboard (it certainly identifies itself as a HID). So it looks like Mac OS X can not see that the keyboard type has changed and the wonderfully simple process that works when connection a keyboard directly fails to even get started.

Saturday, January 3, 2009

Microsoft Expression Media 2

It is probably not a good sign that about a week ago I noticed that Microsoft Expression Media has been updated to version 2. No, not the fact that a new version has been released is not a good sign - the new version was put into public beta in the first quarter of 2008 and the final version was released in the summer. So the product has managed to go completely unnoticed for at least half a year ... is that a sign that I am not paying attention to the usual news feeds and photography sites or that the product failed to generate any interest? I invite you read on and decide for yourself!

[HOWTO] Install Xubuntu 8.10 Intrepid Ibex on Asus EeePC 900A

Amazon just offered a really good deal on the Asus EeePC 900A, which is very much like the original 701 (which I purchased for my trip to India last year) in outward appearance, but offeres a bigger screen with higher resolution and a much faster CPU. The internal SSD [solid state drive] grows to 8 GB, but it uses MLC instead of SLC, which makes is slower than the 701.

Anyways, I will not review the 900A in this post, maybe that will come later. Instead, I provide a detailed account of how I replaced the less than stellar Xandros Linux with the more than decent Xubuntu.

Caution: By following these instructions you will completely erase any data that may have been stored on your EeePC, including the Xandros Linux it came with, and any and all files you have created. Make a backup before you proceed!

General Disclaimer: I describe what worked for me. Your mileage can - and will - vary considerably. Consider this a travel report, not a guided tour. Know what you are doing, don't play with matches, and do not run with scissors! You have been warned. :-)